Building a Low-End Gamer
A low-end gaming machine is the budget option for gaming that best suites those who do not have cash to splash. If you choose your components carefully, you can still end up with a decent machine. Because this machine is a budget gamer and to get the best for your buck, it may require a lot of time-consuming research, and careful consideration before choosing components.
The components we list in this low-end build tutorial are some of the best at the time of publication, no doubt you also realize that with new technology evolving and advancing as much as it does, the components for your build may be different from ours. Our components are a basic guide only!
If this will be your first computer build, we recommend you begin by reading our basic tutorial called “Build a Computer,” this will instill you with the very basic concepts required before attempting a slightly more complicated build. See: Build a Computer
One thing that sets a gamer apart from other computers is not only its increased power and performance, but also the addition of a sound card. While not an absolute necessity, having a sound card will seriously enhance your gaming emersion and experience with a far greater depth of sound, especially if you are planning on using a 5.1 surround speaker system.
When selecting components you will need to ensure they are all compatible, If like me you begin designing any computer by starting with the CPU, if you choose an I5 or an I7 qaud core CPU, you will need to mount it on a board that supports these sockets. Let's say you decide to use an I5 qaud core CPU which is supported by a 1156 socket, you need a mobo (motherboard) that has a 1156 socket, conversely the same applies to an I7 1366 socketed CPU and socket system.
The other items that make up a basic gamer are the video card and ram, ideally you want a video card that has at least 512Mb of onboard ram and hopefully a clock speed around 5-600Htz. As for memory have at least 4Gig of system ram at a minimum, the more the better, but do try and choose ram that has the lowest latency timmings and the highest speeds. If your budget allows for 1600Htz ram, then buy it, but most certainly make sure that your system is scalable, most of the time an upgrade is far cheaper than a new system.
Before we begin, if you haven't already, I recommend that you read my section on 'Building a gaming machine' where I have elaborated on choosing components. Building a budget box means selecting the best components you can find for your spend at the time of your build. Below details a very basic gaming system that comes in just under $1000.
Budget Gaming Machine
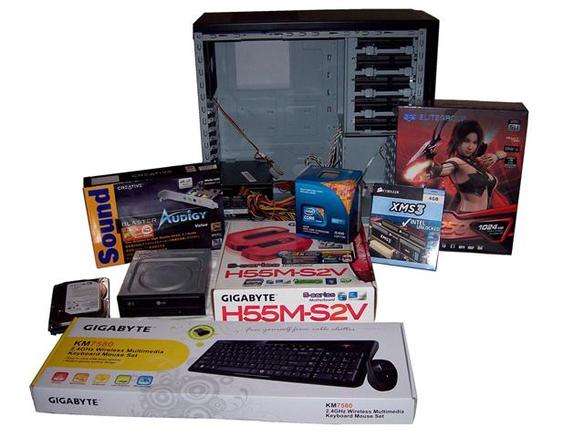
Shown above are the 'bare bones' components for a budget gamer, obviously this machine will not out do the high end gamers but it will certainly out-perform any standard desktop machine at the time of writting.
This particular machine was designed by starting with the CPU, since this is the heart of the computer and perhaps one of the most important components that will determine the performance of your new machine. I often design gaming machines from the inside out, beginning with the CPU, motherboard, video card, ram, hard drive, system case, etc and usually in that order.
This gives you a good grounding for what you can realistically expect once you have your new rig up and running. As for the OS (operating system) Windows 7 64bit would be the obvious choice, certainly at the time this tutorial was made. Windows XP is fast becomming obsolete and does not support the security you get from Windows 7.
Building your buget gamer is really not that much different from a basic desktop system accept you will be using slightly more powerful components. To begin grab yourself a phillips heap screw driver and a small flash light. Make a space on your tabel or bench and ensure that you have plenty of room and also keep touching the metal part of the system case should you be working in a cold and dry environment. This is to prevent ESD or electrostatic discharge when handling the more delicate components such as your motherboard and other circuit borads etc.
ESD can zapp a computers circuitry like a 1000volt charge that cripples its intergrated circuits rendering it totally useless. Our bodies always carry a certain amount of static electricity and we need to touch something metal (discharging this static) before we touch any curcuit borads to prevent ESD.
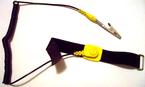
You can if you like, purchase and wear an antistatic wrist strap that simply connects to your computers metal case with an aligator clip at one end and a wrist band at the other, this is perhaps ideal in cold and dryu environments where static buildup is more prevelant especially when working on carpet. Warmer moist environments and during the summer months reduce static buildup and wearing a starp will tend to get in the way much of the time, for the most part, I simply touch the metal case before I handle any circuit boards, even if they are installed in the case.
Building your budget gamer
Assuming you have found a good spot to build your computer and have the correct tools and observe ESD precautions, let's take a quick look at the parts we need to make this work.
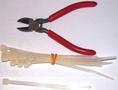
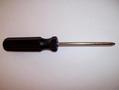
For the build you will require the following:
|
|
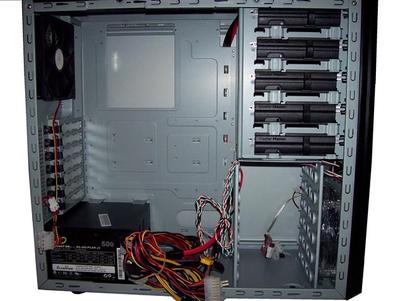
First of all you will need to prepare the system case, remove both side panels and be careful not to loose the srews. Unfirl the mass of wires comming from the PSU (power supply unit) Also be aware that many gamming cases may not include a PSU and you will have to purchase on separatley, just ensure that it has enough power to run your system with everything at max power.
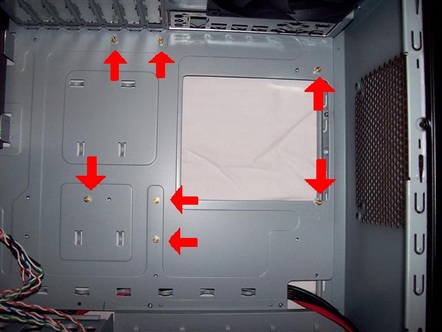
Once you have done this, lay the case on its left side exposing the motherboard bay where we now need to acertain where to place the stand-off screws. It is best to do this by checking your motherboard and locating the screw positions, some people place a piece of paper underneath the board and then draw dots where the screws will go. They then place this in the case and insert the screws through the paper or simply use it as reference. Because most newer motherboards are micro ATX or ATX type boards, the screw positions are set in standard locations.
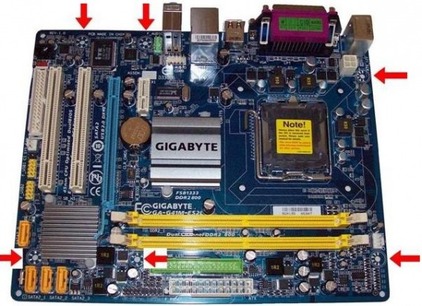
Note screw locations on the motherboard
Now screw-in the stand-off or riser screws into the motherboard bay so they match the screw holes on your motherboard. Be aware that your board and hole positions may differ from the images.
Now take the IO (input/output) plate and carefully insert it into the rear of the case. Make sure it is orientated correctly by checking the output ports on your motherboard and seeing how they will orientate once installed inside the case. A good tip is that usually the keyboard and mouse ports are towrads the top of the case while the three holes ofr the sound ports are at the bottom. The IO plate should have the tiny metal splines facing inwards, and do be carefull as these and the edges of some plates are very sharp!
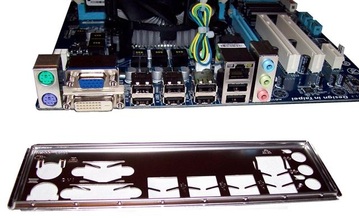 Check your motherboard and the port locations so the IO plate will be orientated correctly in the case |
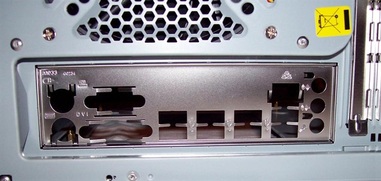 IO plate correctly orientated with keyboard and mouse ports at the top and the three sound ports at the bottom with the tiny metal splines facing inwards. |
Now that the case is prepped we need to prep the motherboard before installation, I usually start with the CPU and then follow up with the ram. Before you touch your motherboard or CPU, observe the antistatic precautions by touching a metal part of your case or ware your strap with the alligator clip connected to a metal part of the case.
To install the CPU you will need to remove the plastic protective cover from the CPU socket. To do this relase the load plate lever arm by firmly pushing down and away from the socket and then raise the arm. This will release the load plate so you can then slide the plastic protective cover away from the load plate as shown in steps 1 and 2.
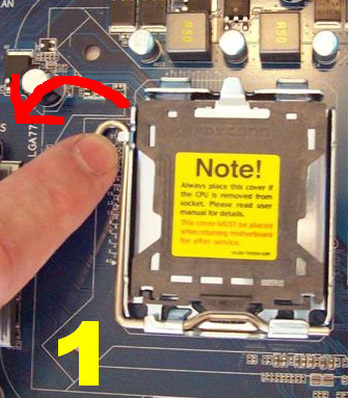 Push load plate lever arm down and away from the CPU socket to release the load plate |
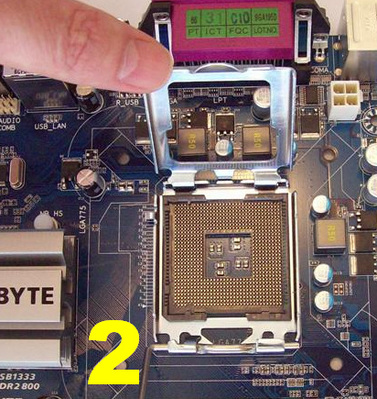 Remove the plastic cover and open the load plate |
The next thing you need to do is take your CPU and orientate it to be correctly seated in the CPU socket. You can do this by observing the small notches on the CPU die and see how they correlate to the CPU socket. The CPU is keyed to only fit one way and you may notice a tiny triangle in the upper left corner of the CPU die, (some newer qauds and 6 core CPU's may not have this!) The triangle orientates to the missing pin in the CPU socket as depicted by the red arrows below.
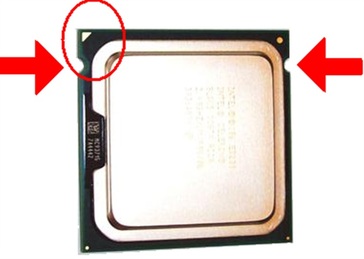 |
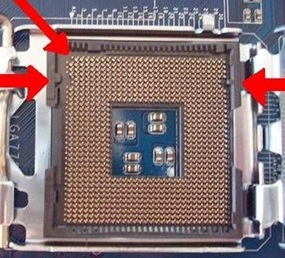 |
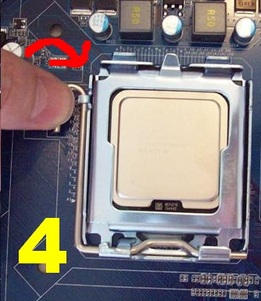
Once you are happy with the orientation of your CPU very gently lower it into the socket. They call these sockets ZIF sockets. ZIF stands for (zero insertion force) meaning you never apply pressure to put the CPU in the socket. By doing so can damage both the underside of the CPU and the small pinouts within the socket. Once the CPU is happily seated simply lower the load plate back over the socket and replace the load plate lever arm back into place so it is latched as depictede in steps 3 and 4. This may require some pressure, do not be afraid to apply mild pressure, should you have the CPU seated correctly it should't cause any damage.
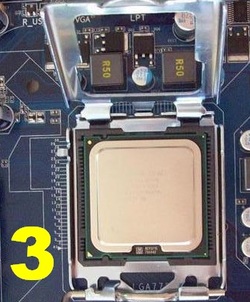 |
 |
The next step involves applying a small amount of thermal grease to aid cooling of the CPU, this is critical for those that will be overclocking their machine.