Changing Icons

One sure thing about being human and having a developed consciousness, leads to people acquiring different tastes for different things. The evidence of this becomes clear with our style and layout of one’s desktop. You may well be hard pressed to find two alike. !
Based on this, no doubt the Microsoft programmers knew well in advance that people would prefer a customized approach to computing. This forethought amongst other things enables you to shape the look and style of not only your desktop but also your icons.
How often do we get a little tired of looking at that drab old beige looking folder thingy said to represent a new folder or shortcut. No prizes for best guess, the good news here is that you can actually change the look and style of these icons and make them into something you want.
How often do we get a little tired of looking at that drab old beige looking folder thingy said to represent a new folder or shortcut. No prizes for best guess, the good news here is that you can actually change the look and style of these icons and make them into something you want.
It is possible to make your own fully customized icons just by using software already built in Windows. There are of course many other third party programs and applications designed specifically to create new icons, that no doubt work just as well, but some of these may ask you for a sentimental donation. My argument here, why pay when you already have. !!
So stick your wallet back in your pocket and let’s have a play with our own creativity. First things first, we will keep it simple and work our way toward the advanced modes of icon modifications. I might assume you may want to change an existing icon, say a one that looks like a folder, so maneuver to the desktop and hover the mouse over a folder you want to change. The steps to change an icon are a little different and I will detail them down the page.
So stick your wallet back in your pocket and let’s have a play with our own creativity. First things first, we will keep it simple and work our way toward the advanced modes of icon modifications. I might assume you may want to change an existing icon, say a one that looks like a folder, so maneuver to the desktop and hover the mouse over a folder you want to change. The steps to change an icon are a little different and I will detail them down the page.
The steps below outline how to change a folder into an icon.
How to Change a folder into an Icon:
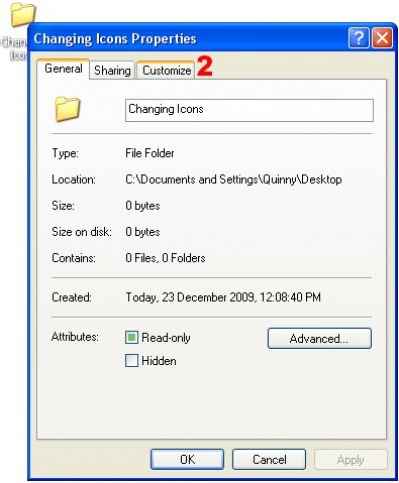
Step 1) Right-Click the folder or icon and select Properties.

Step 2) Click the Customize at the top.
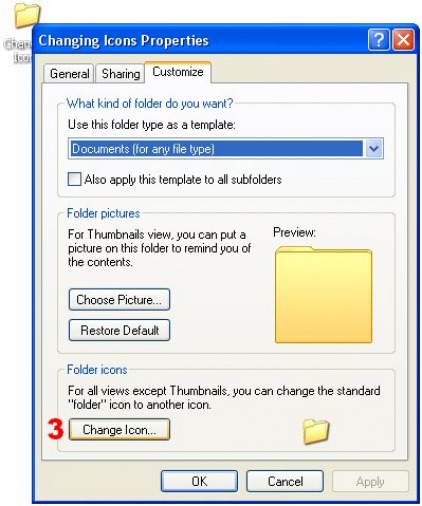
Step 3) Click Change Icon.
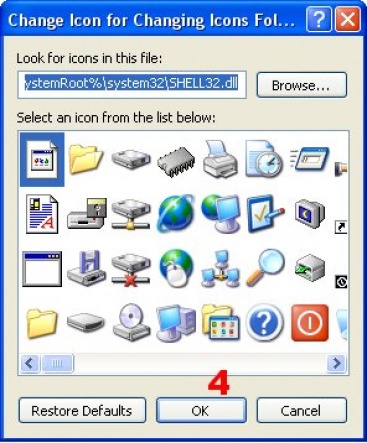
Step 4) Choose an icon and click OK in the same window. Scroll across for more icons.
Step 5) Click Apply and OK.

And now your icon has gone from this:

To This:

How to Change an Icon:
So that’s how you do it for a folder, but what about an icon?
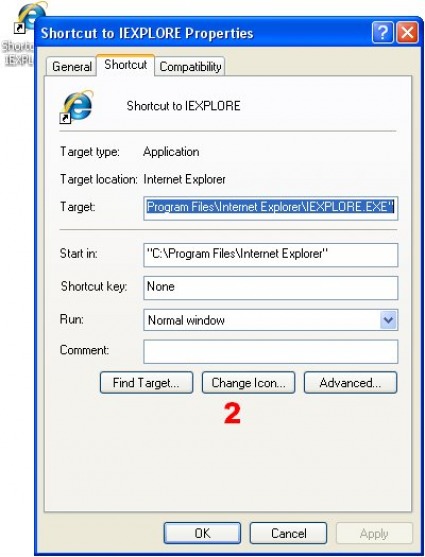
It is basically the same process but a couple of the above steps change a little. First of all let’s right-click an icon, we will use the “IE” or Internet Explorer icon in our example.
Step 1) Right-click the icon and select Properties.
It is basically the same process but a couple of the above steps change a little. First of all let’s right-click an icon, we will use the “IE” or Internet Explorer icon in our example.
Step 1) Right-click the icon and select Properties.
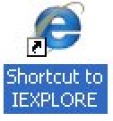
Internet Explorer Icon
Step 2) Click Change Icon.
You will then see a new window that looks the same as the one below.
Click Change Icon
Step 3) Choose an Icon and Click OK.
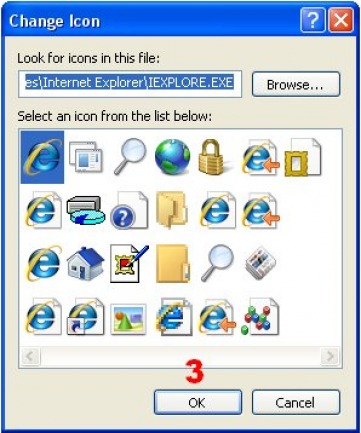
Choose Icon and click OK
Step 4) Click Apply and OK.
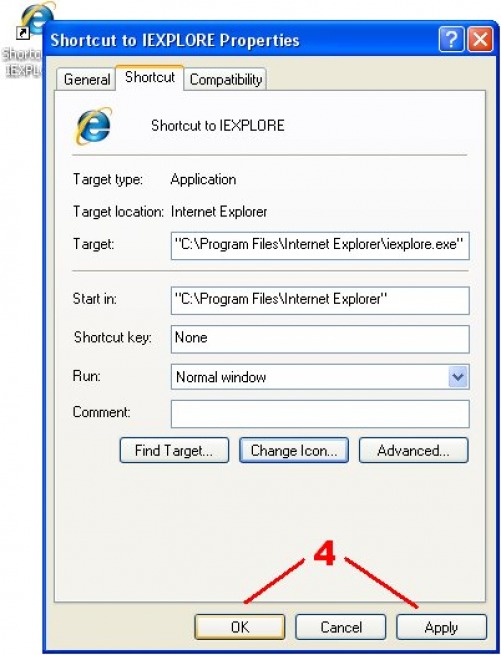
Click Apply and OK
The above process should work for almost all icons depending on the program they represent. Some will have different icons displayed in the selection window.
One thing you may find interesting, is that certain programs might only have certain icons ascribed to them that can be changed. Even though this defaulted by the program, you can still make modifications or even make your own.
There are many other ways of changing icons and even creating new ones. If you wish to create your own icons, see our page on creating icons.

Well Done !!