Disk Defragmenter

Disk Defragmenter is a Windows "housekeeping" utility program that is basically designed to keep your hard drive in good working order. If you have read the disc cleanup tutorial, you will know that I make reference to libraries for hard drives. To learn more about Disc Cleanup, click here.
Since all of your data is stored on the hard drive, the idea that it becomes a kind of library full of your downloaded or installed information, makes it very easy to understand the principles behind programs like disc clean and disc defragmenter.
Since all of your data is stored on the hard drive, the idea that it becomes a kind of library full of your downloaded or installed information, makes it very easy to understand the principles behind programs like disc clean and disc defragmenter.
Disc clean basically cleans the drive, like a librarian replacing all of the books you got out to view as files etc. Disc clean cleans the drive freeing it from accumulated rubbish that clogs the system, in this respect it can make for a very tidy library but with one big shortfall. That is, although the books have been replaced on shelves, the order in which they were replaced however is somewhat disorderly, and becomes difficult to locate them when they are not replaced in alphanumeric order.
That pretty much describes what fragmented files are, they are pieces of information belonging to a particular file or program, that become scattered all over your drive or library. When your files are in such disarray they are said to be fragmented. That is to say, the more you use your computer, the more fragmented these files, or "books" become.
Now assume we had a set of encyclopedias that belonged together forming one massive file. And say many people had used each of these books, but had not replaced them in their correct order or shelves. This results in them being distributed throughout various locations within the library. So if we tried to read them from A to Z as if they were one big book, it would be extremely arduous and time consuming because they are not all grouped together in their alphanumeric order. Hence they are said to be “fragmented”.
If they are fragmented , or scattered throughout the library they are also what is known as “non-contiguous” files. If however they were all placed back together in their correct order, they would then be what we call “contiguous files”.
This is where disc defragmenter comes into play, it basically reshuffles these books or “files” and recompiles them so they establish and orderly fashion. This is how disc defragmenter keeps your drive in good working order. It makes our set of encyclopedias contiguous, placing them in their intended and respective order and on the correct shelf. In fact disc defragmenter does this for many of the files on your hard drive, as you can see, the better organised the files or "books" are, the faster your computer can retrieve them.
This process also helps to free up your hard drive space, with disc defragmenter placing all of the files side by side making them contiguous. Once all these files are sorted at one side of your drive, there is space available for new files that was once occupied by fragmented files.
To achieve optimum performance from your computer, run disc cleanup first and then defrag, disc defragmenter should be run at least once a week. You can in fact schedule it to run automatically using another built in Windows utility called “Scheduled Tasks”. To find out more about scheduling tasks, click here.
How to use Disk Defragmenter
So how do we get started with this defrag thing? There are three ways of getting it started, I will show you the first way, which also works in Vista and Windows 7 as shown below. The other way will work in XP but may differ in Vista and Windows 7 depending on your Windows configuration.
You can access disc defrag from the Start menu as you would to use disc cleanup. With this method simply click the Start button and then cursor up to All Programs, from here navigate your way to Accessories, then System Tools and then Disk Defragmenter. Next click on disk defragmenter, this will launch the program. Keep in mind also that you can now set disk defrag as a shortcut either in your start menu or on the desktop by utilizing the right-click function.
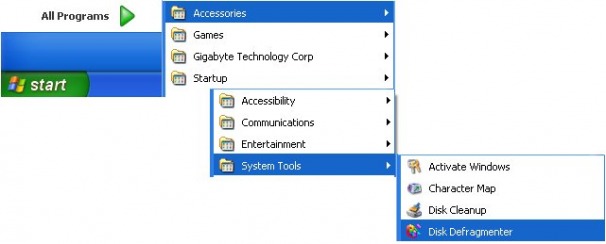
Click: Start/All Programs/Accessories/System Tools/Disk Defragmenter
Another easy and very popular method once again draws its attention to the “Run command”. Put simply, you click Start then click Run and type in a command, this then launches a program and hence it is called the “run command”, because it runs a program.
Below details these instructions:
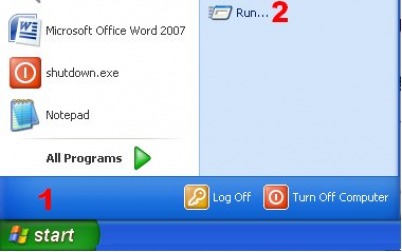
Step 1) Click Start.
Step 2) Click Run.
Click Start and then Run
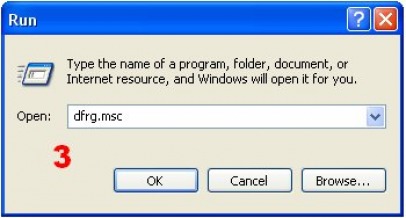
Step 3) Type “dfrg.msc” in the dialog box and click OK.
Run Command
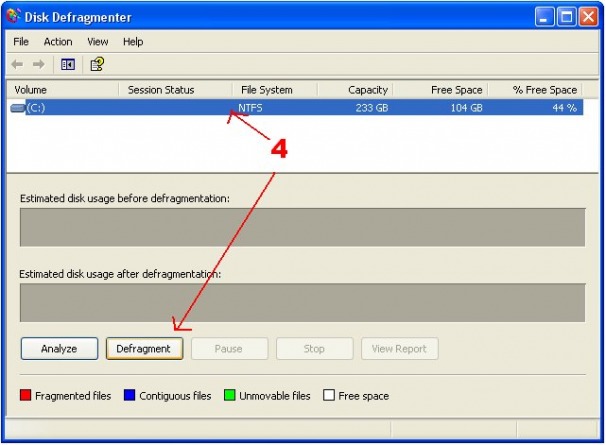
Step 4) Click and highlight the Drive you want to defrag, then click defragment.
Select Drive then click Defragment
Some computers may have multiple drives or partitions depending on the way they were formatted, more commonly it is just the ‘C” drive you need to defrag. You can also defrag other drives using the same technique, let’s say for example that you want to defrag your USB stick or external hard drive, this can be achieved using this method.
Now all you have to do is let disc defragmenter do its thing. It may take some time depending on how long it has been since you last defragged, if this is your first time ever then it may take quite awhile. Basically the longer between defrags and the more files on your drive, the longer it takes. Some new computers will have practically nothing on them, and therefore will not need defragging.
While older ones that have relatively full drives may not in fact have adequte space to perform a defrag operation. In the latter case you will need to delete some files or programs to free-up some space. As much as a our virtual librarian needs a little bit of work space to complete her job, so does your hard drive.
You will notice at first when you click “defragment” that it will analyse your disc checking for free space etc. So here our virtual librarian swings into action checking shelves and the order of our books before she decides on where to start.

Click close and thats it !!
Once defrag has completed you will see a new window appear, it will say “Close” or “View Report”. You can view the report which details files that may not have been defragged and those that have. Usually though you would simply click “close” and your all done.

Mr Defrag !!