Disk Cleanup

So what is disc cleanup and why use it? Disc cleanup is a Windows utility program of the housekeeping variety, this program is basically designed to clean up your hard drive to free up space, and thus help improve performance. You could say it is a kind of house maid that comes in, and does the clean and tidy for you.
Over time Windows tends to leave little bits of program clutter all over your hard drive, it kind of becomes a very messy house! This has the effect of slowing down your computer and takes longer to search and retrieve files. The longer you leave your housekeeping chores the slower your computer will go.
Housekeeping maintenance is mandatory if you want optimum performance from your computer, two primary utility programs for this are, Disc Cleanup and Disc Defragmenter, to learn more about disc defragmenter, click here.
In this tutorial we will focus on disc cleanup, for us to completely understand its actions, we first of all need to know a few facts about our computer’s hard drive. The hard drive, or HDD (Hard Disc Drive) is the part that houses all of your information and things you have loaded or downloaded onto the computer, it is also where Windows resides.
It is a kind of storage device that works like a library that stores all of your files, these files are really not that much different to library books being stored on shelves. This is also why the HDD is often referred to as “storage”, and is measured in “gigabytes”, which equates to how many thousand megabytes the drive can hold. Actually just for the record, 1 gigabyte is 1024 megabytes. A good analogy I use, builds on the idea that each gigabyte is similar to a book shelf in the library, so the more shelves you have, (gigabytes) the more books you can store, or the more files you can have on your hard drive. So the bigger the HDD, the bigger the library.

HDD A Library of Files
With this scenario, you could imagine that for your computer to retrieve a certain file, it has to first find the book shelf upon which the book, or “file” is located. From here it then brings it to the front counter at which, you are waiting to accept the file, so you can then begin working with it. You could say, you have a kind of virtual librarian within your hard drive that constantly searches and retrieves files at your request.
The biggest problem with this kind of operation, is that the librarian does not always place these files or “books” back after use, and will also sometimes copy some parts of these files and then leave the copies laying around the library. Eventually the library “HDD” becomes a very messy clutter of files, books, copy paper, search cards and you name it! As you could imagine, this would make searching for a particular book a nightmare and take quite some time. Geez, kind of sounds like a slow computer eh!! Well that’s what your computer goes through if you do not perform the housekeeping chores regularly, in fact it only gets worse the longer you leave it!
The biggest problem with this kind of operation, is that the librarian does not always place these files or “books” back after use, and will also sometimes copy some parts of these files and then leave the copies laying around the library. Eventually the library “HDD” becomes a very messy clutter of files, books, copy paper, search cards and you name it! As you could imagine, this would make searching for a particular book a nightmare and take quite some time. Geez, kind of sounds like a slow computer eh!! Well that’s what your computer goes through if you do not perform the housekeeping chores regularly, in fact it only gets worse the longer you leave it!
So how do you fix this clutter?, you get the librarian to do a clean and tidy or “Disc Clean”. When this program launches it will ask you what files you would like cleaned up, it will also delete certain files, (like copies of files etc) that just clog up and slow down the computer.
The files and folders disc cleanup “spring cleans” are listed below:
· Recycle Bin
· Temporary Internet Files
· Windows Temp Files
· Unused downloaded program files
· Old Compressed Files
· Error Reporting and Log Files
The files and folders disc cleanup “spring cleans” are listed below:
· Recycle Bin
· Temporary Internet Files
· Windows Temp Files
· Unused downloaded program files
· Old Compressed Files
· Error Reporting and Log Files
|
Another thing disc cleanup does is compress old files, like our virtual librarian pushing some books to one side on the shelves making extra room. She also cleans up any fragments or copies of files and any other deleted clutter, so she empties the Recycle Bin, “takes out the trash”. She spring cleans the library.
|
 |
Just like regular housekeeping and cleaning, if it was not done regularly your house eventually winds up being a complete mess, and chances are you wouldn't let this happen. So why would you do it to your computer. !!
I have seen some computers literally grind to a halt because the drives are both too full and loaded with clutter, in fact, as well as regular disc cleaning and defragging etc, you should really reformat your computer at least every 12 months for optimum performance.
As well as disc cleanup and disc defragmenter, there are other utilities and applications in Windows that you can use to help improve drive performance. One of them actually allows you to task schedule your housekeeping so these chores are undertaken automatically. They will be explored under the Windows Tips link on this website. We recommend that you run disc cleanup at least once a week and then run disk defragmenter straight after.
How to use Disc Cleanup
There are a few ways of getting to disc cleanup, probably the most common comes with using the Start and All Programs menu. This way is very easy, simply click Start and then cursor to the All Programs menu and scroll up to Accessories. Now cursor right highlighting System Tools, and from here cursor right again to highlight Disc Cleanup, all you have to do now is left-click Disc Cleanup.
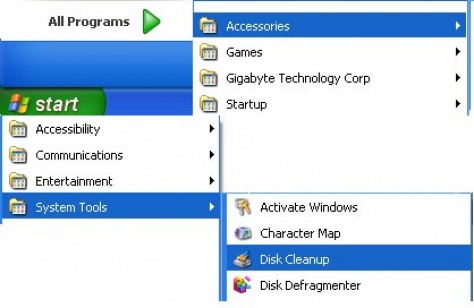
Click: Start/All Programs/Accessories/System Tools/Disk Cleanup
While you are in this neck of the woods, why not have a bash at the right-click mouse function, if your cursor is still hovering over disc cleanup, you can right-click and select “Pin to Start menu”, and now left-click. This places a disc cleanup icon on your Start menu, so if you click Start, it will be displayed in the top left column. From here on just click the icon to start.
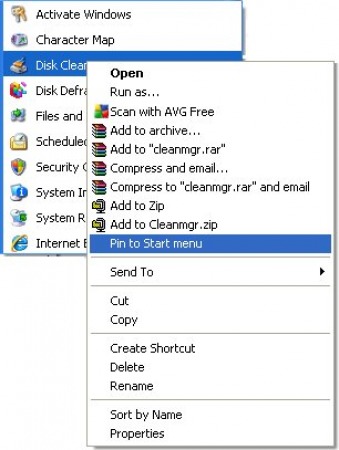
Right-Click for many Shortcut Menus
You can also set a shortcut to the desktop by highlighting the “Send To” and then selecting and left-clicking the “Desktop Create Shortcut”. Again all you have to do is click the icon. To find out more about "creating shortcuts", see: Creating Shortcuts
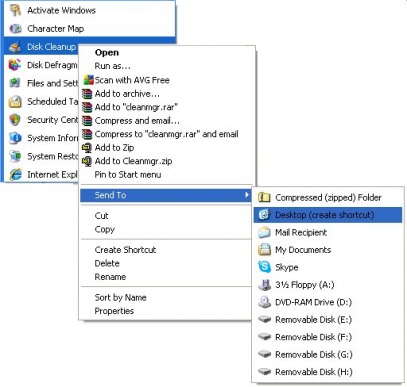
Create a shortcut on the desktop
After all that mousing and clicking there is another way many people use and it begins again with the Start button and the Run command.
Below details these simple steps using the quick and easy method.
Step 1) Click Start then click Run
Step 2) Type “cleanmgr” in the Run dialog box and click OK

In most cases especially the first time you use disc cleanup, you will have to select the drive you want cleaned, this is usually C drive although it may vary based on your computers drive configuration. Either way click to select the drive you want.
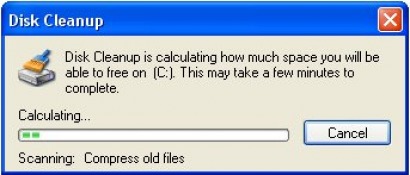
You may end up seeing a new window that tells you it is compressing files, this is what normally happen and does not usually take too long depending on your computers activity between your last disc clean.
After the files have been compressed, it is time to let disc cleanup do its thing, you will now be presented with a screen that has numerous tick boxes, click and tick all of these boxes for the best clean up.
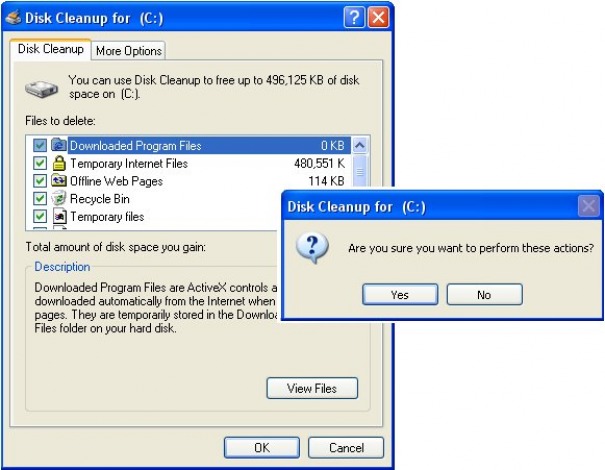
Step 3) Click OK and in the new window click Yes
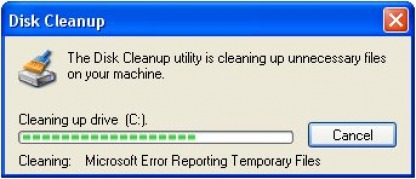
After you click yes disc cleanup will begin cleaning your drive of unwanted clutter, if you have not initiated a disc clean for quite some time it may take several minutes for it to complete. While disc cleanup is performing its task you will see a status bar appear indicating its progress. This window will simply disappear once this process is complete.

I'm all clean now !!