How to make your own Icons
 |
Most of us like to personalize the things we own, most of all our computers. This tells something about us including our likes and dislikes, and perhaps our taste. This cutomisation is representative of one’s own flavor and style, and is clearly visible in a person’s choice of icons, desktop layout , Windows theme and background wall paper and so on.
|
Because our computers are personal and say something about us, why not learn how to customize your own icons and even create your own. In this tutorial we will show you how to make your own icons, we recommend however that you first read our page on changing icons.
Assuming you have been introduced to changing icons and have a basic understanding of what is involved, there is also another application that you need to know a little about before we begin. This is also a default Windows program, known as “Paint”, or “Paintbrush” or “MS Paint” as it was formerly known in earlier versions of Windows.
Windows Paint is a very simple graphical editing program that enables you to create, modify and edit images scanned or installed on your computer. It is an extremely basic program and there are however many other third party programs that you can use to achieve the same thing. We will be using “paint” in our example as it is already default in Windows and therefore does not require additional software.
Windows Paint is a very simple graphical editing program that enables you to create, modify and edit images scanned or installed on your computer. It is an extremely basic program and there are however many other third party programs that you can use to achieve the same thing. We will be using “paint” in our example as it is already default in Windows and therefore does not require additional software.
Let's make Icons
Because we will be using use Paint in our example, let’s begin by starting up paint. There are two ways of doing this, one involves using the “Start/All Programs menu” and the other uses the “Run” command. If you are a fan of the run command, type: mspaint and click OK.
Using the first method, click Start, then click All Programs, then click Accessories and then cursor right and click on Paint.
Using the first method, click Start, then click All Programs, then click Accessories and then cursor right and click on Paint.
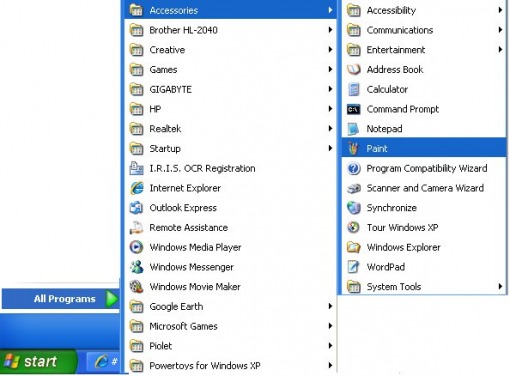
Click: Start/All Programs/Accessories/Paint
The second method using the run command is even easier, simply click Start then Run and type “mspaint” (no commors) in the dialog box. Now click OK and it will open Paint.
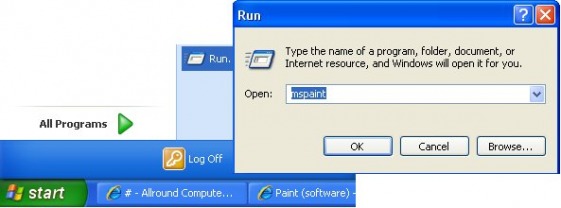
Click: Start then click Run and type mspaint
Once the paint program is up and running we need to make some modifications so we end up with our icons being the right size. To do this click "Image" in the tool bar at the top and then scroll down, select and click "Attributes".
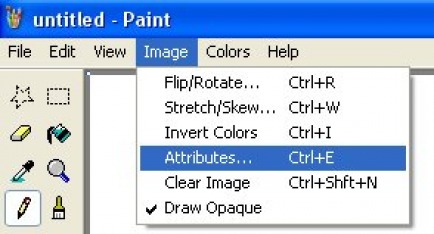
Click Image then select Attributes
You will now see a new window where we need to adjust the attributes of our image, click in Width and Height, and enter “32” and then click OK.

Enter 32 in each window and click OK
We now need to go back to the toolbar at the top and click “View”. From here scroll down to “Zoom” and cursor right and click “Custom”.
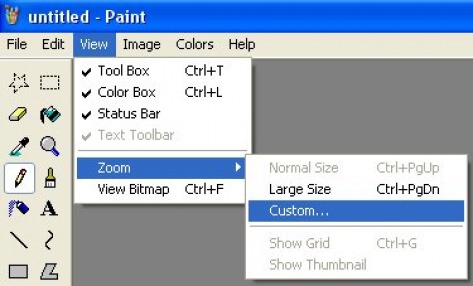
Click: View, Zoom, Custom
You will now see the custom zoom window, click the “800%” and click OK. You can click 400% or higher but 800 is best for a more accurate drawing.
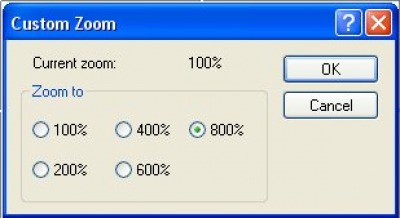
Clcik 800% then OK
Now we must go back to the toolbar menu and click View, once again, scroll down to `Zoom"', and then cursor right and click “Show Grid”.
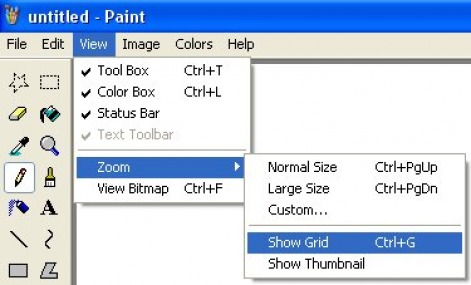
Click: View, Zoom, Show Grid
Now you will have a screen with a grid where you can begin drawing your icon.

You can use the colour palette at the bottom of screen for choosing different colours, and the toolbox at the side for drawing tools.
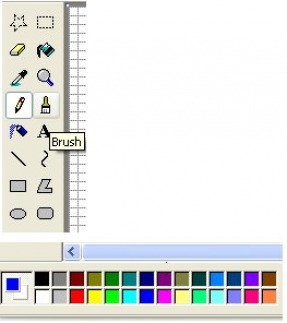
Colour Palette and Toolbox
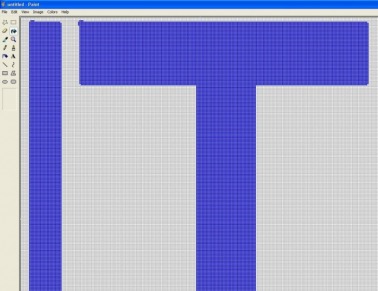
Using these tools we have used the colour palette and selected blue, then used the drawing tools on the left to draw IT. "Stands for Information Technology" !!
Once you have finished drawing your icon, you must now save it as an “ico” file, this is so windows will recognize it as an icon. You must give it a name and always suffix it with the (.ico)extension. For example the file above was saved using "IT.ico" and saved to a location on the computer.

Are we there yet !!
To save your file, click File at the top left then scroll down and click “Save As”.
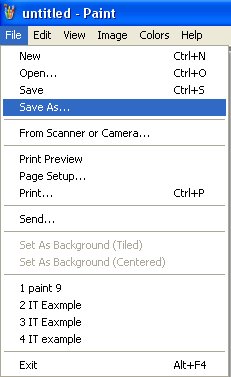
Click File and Save As
Now in the save window give your new icon file a name, remember to suffix it with the .ico extension. In our example circled in red you can see we called it IT.ico.
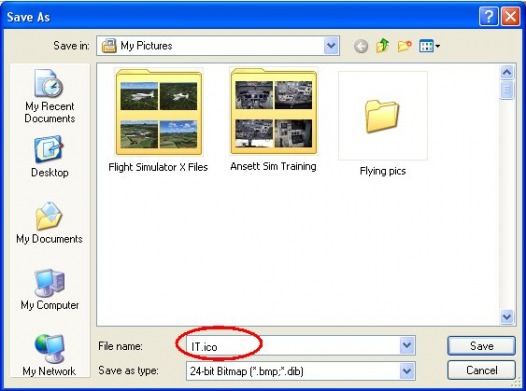
Save to My Pictures and title it as a .ico file extension.
By default your image should be saved to the my pictures folder, you will need to “browse” to this folder later when you change your icons. You can make a new folder and store your icon files there, obviously you will then have to browse to its loaction to select the icon you want.
After you have completed all the above, all you need to do is click on an existing icon and replace it with yours. Follow the steps listed in changing icons on this website, you can find them here.
If you read the changing icons page, the first few steps are the same except for step 4. When you get to step 4, click “Browse” and then select the icon from your saved location. Then click Open, OK and Apply and OK.
If you read the changing icons page, the first few steps are the same except for step 4. When you get to step 4, click “Browse” and then select the icon from your saved location. Then click Open, OK and Apply and OK.
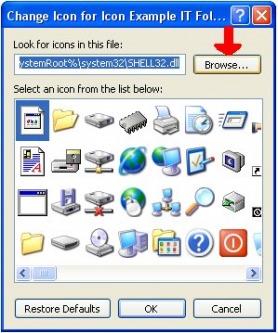
Click Browse
Here is the process in a nutshell, first make your icon, save it as an .ico file. Right-click the icon you want to change, select Properties and click the customize tab. (You may just have to click “Change Icon” instead).
Now click Browse and select your icon, click Open and click OK. Now click Apply and OK.
And that is how you make your own icons, you can do much more than this and customize them as you like. In the above tutorial however we are only attempting to give you a basic insight into this method. Hopefully this has given you enough to begin making your own icons.

That took a while !!