How to Email Photos

Say Cheese !!
How good are computers, well, should I say how good are they for sharing information. This is a very loud ringing bell for the older generation, you can in fact share your photos, etc, almost as many different ways as you may think possible. Welcome to the world of electronic media. Put simply, this means you can send your files and photos via electronic mail, so you’re intended receiver can view, store or print them as desired.
Before you can email a file or photo, you first of all need to know how to locate the file. Given that there are many programs available that will enable you to accomplish the same task, our tutorial here will focus on Windows XP and how to simply email a photo as an example. The instructions we will show you here also work in Windows Vista and Windows 7.
Obviously you will need an email account already setup and this example is based on Microsoft's default email program called Outlook Express.
Much like our tutorial on burning files we will demonstrate how to email a photo from the “My Pictures” folder. Assuming you already have your images filed at a specific location and you know how to access these files, we will show you how to email them.
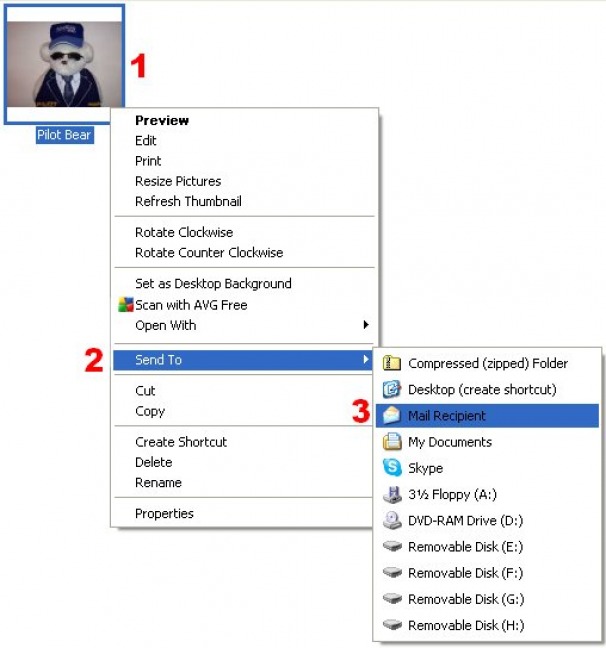
Once you have your file or photo you wish to email, place the cursor over it and using the right mouse button “Right-Click” the file. The right button is very often neglected and people do not realize this button provides us with a short cut for completing many tasks.
Before you can email a file or photo, you first of all need to know how to locate the file. Given that there are many programs available that will enable you to accomplish the same task, our tutorial here will focus on Windows XP and how to simply email a photo as an example. The instructions we will show you here also work in Windows Vista and Windows 7.
Obviously you will need an email account already setup and this example is based on Microsoft's default email program called Outlook Express.
Much like our tutorial on burning files we will demonstrate how to email a photo from the “My Pictures” folder. Assuming you already have your images filed at a specific location and you know how to access these files, we will show you how to email them.
Once you have your file or photo you wish to email, place the cursor over it and using the right mouse button “Right-Click” the file. The right button is very often neglected and people do not realize this button provides us with a short cut for completing many tasks.
Below outlines the steps to email a photo.
Step 1) Right-Click the image
Step 2) Scroll down the menu box to the “Send To”
Step 3) Cursor right and in the next menu box, highlight and click “mail Recipient”
Step 2) Scroll down the menu box to the “Send To”
Step 3) Cursor right and in the next menu box, highlight and click “mail Recipient”
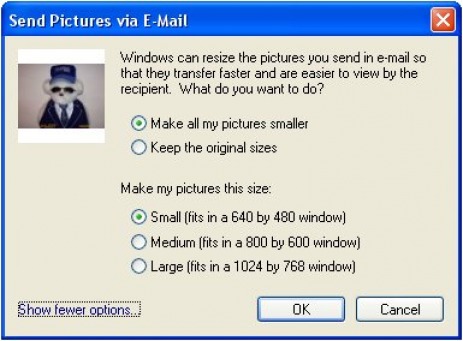
You will now see a new window appear in the top left asking if you would like to resize your image. This enables you to send the file in a compressed format, the file shrinks so it can be sent much faster, it may take some time for this compression to complete should you be sending a large or multiple files.

Step 4) Click “OK” to resize the image or images.
You will also have the option to keep the original size if you wish, or you can click on the “show more options” line that then gives you the choice to select the size you want.
You will also have the option to keep the original size if you wish, or you can click on the “show more options” line that then gives you the choice to select the size you want.
After the compression completes you will be presented with the default mail page for sending email via Outlook Express. All you need to do now is add an address where your image will be sent and type a message. It is also good practice to title the subject filed about the content.
Step 5) Now place the recipients email address in the top line and click the Send button.
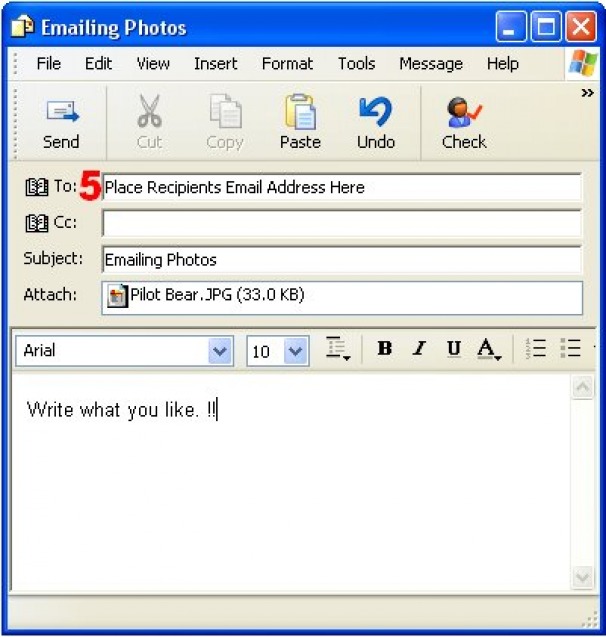
Now simply write what you want and click send. !!
Should you choose to send multiple images you can hold down the “Ctrl” key and then left-click selecting the images you want to send. After that use the right-click technique on just one of the files and follow the instructions above, this will send multiple files at once.
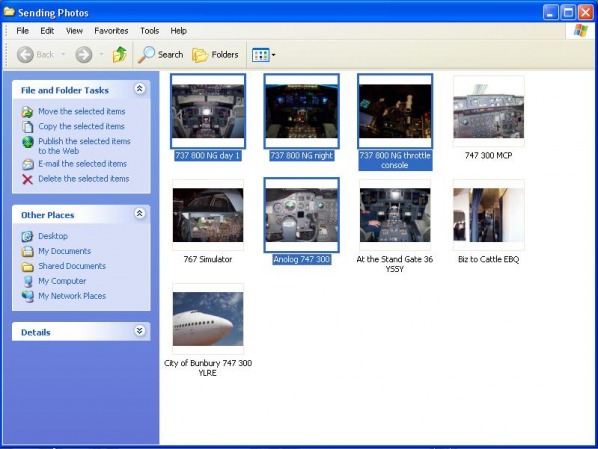
Hold Down Crtl and Click the Images You wish to Send.
You can also simply send a folder with photos instead, or you can also use another method where you make the email first and then attach your files etc. That particular method is rather tedious and frustrating for beginners; the “right-click” method is quicker and simpler.
